The New RAM Platform
Overcoming integration challenges.
Words by Cabe Sipes

When I started in the car audio industry, things were much simpler. It wasn’t uncommon to go to an audio shop and find one or two installers who weren’t there for a career—just a normal job like fast food or retail while attending school. That’s because car audio was straight-forward when it came to installing a radio or speakers. Cars only required a dash kit and a simple harness, and you could train someone to wire it in a short time. It didn’t require a high IQ or skills.
Today, that’s not the case. To be a successful installer you need to love the industry and approach it as a lifelong career due to the amount of knowledge required for modern day vehicles. You also need to have the proper tools, disassembly skills and electrical knowledge to work with modern CAN Bus networks. Additionally, you need to have relationships with those you can trust in the industry, people you can learn from. No matter how much you think you know, you do not know everything.
Facing New Challenges in Integration
With over 30 years of experience, you can imagine my surprise when a 2025 Ram 3500 Longhorn with a Harmon Kardon system came to the shop for an audio upgrade and the job went from two weeks to six weeks. This happened because the new 2025 Rams have implemented a new CAN Bus platform. The CAN Bus is a bunch of paired wires that run through a car from and to all modules. Think of them as CAT5 cables tying different computers together to create a network of communication. Computers all need to run on an operating system, like Windows, and have the appropriate access to communicate with each module.
The new Ram trucks are implementing a platform with all new encryptions and permissions to each of the vehicle modules including the Infotainment and audio system. What this means is that any interfaces made by companies like PAC or AXXESS—which allow you to integrate aftermarket equipment into an OEM audio system—will not work. It’s as if you’re trying to add software made for Windows XP to the newest Windows operating system. It just won’t work.
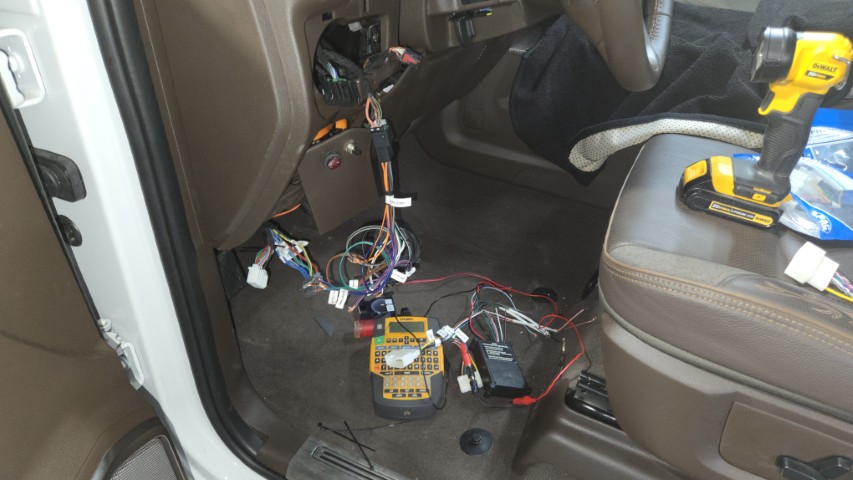
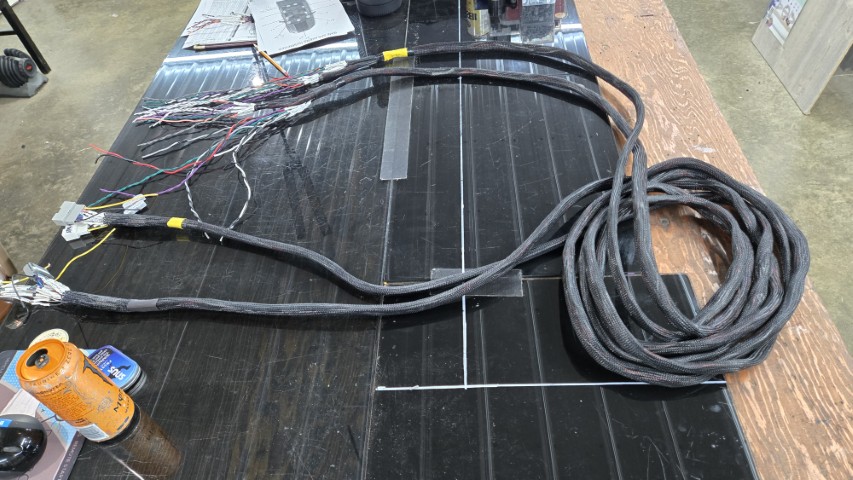
I was aware of these changes, but misinformed on which models were affected. I believed that the 2500 and 3500 models had not yet been updated, and that only the 1500 series had. With that information, I designed an entire build using a PAC AmpPro for integration and Audiocontrol DM-810 DSP going to an Audiocontrol LC-6.1200 and LC-1.1500 and all new Audiocontrol speakers and subs. Once the vehicle came to the shop, I pulled the radio and plugged in the AmpPro to verify communication and that’s when the first sign of trouble appeared: There was no communication with the network. This 3500 did, in fact, have the new platform. A decision had to be made to either kick the job and move on or accept the challenge and figure out a way to continue forward. I chose to move forward and began the long process of disassembling the interior and looking for any differences in the audio system compared to previous Rams I’d worked on. I also started photographing any and all harnesses related to the audio system.
How to Identify the New Platform
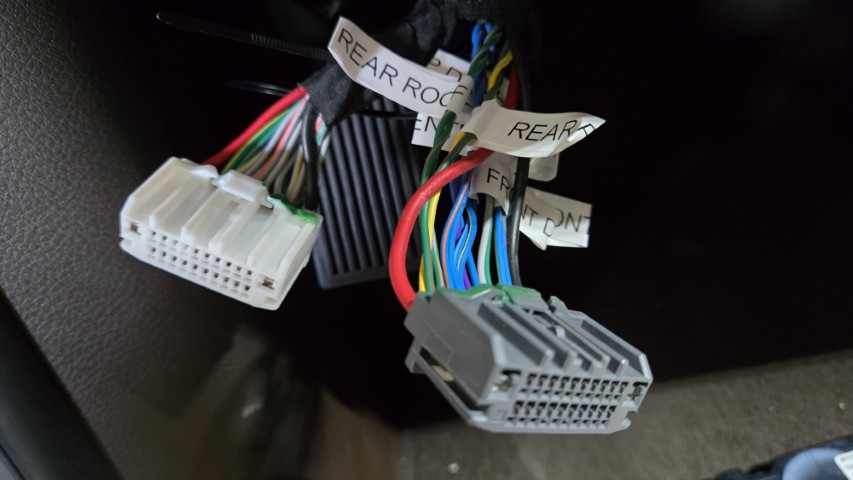
Does the Ram you’re working on have the new platform? You can tell by looking at the amplifier located under the driver’s side dash, mounted vertically with the plugs facing toward the rear of the vehicle. You can’t reach all the plugs from under the dash, so the removal of the headlight switch is required.
Using a light, look into the cavity and see the remaining plugs. In previous years, the amplifier had three plugs, but the new models will have four. This is an indicator that the Ram has the new platform, and at the time of this writing, you won’t be able to use any available integration pieces.
Once the amplifier has been found, it’s time to identify each of the wires in the amplifier plugs. This can be done by blindly probing, which is not recommended—or in a more systematic way by removing each speaker and comparing the wire colors to the colors in the amplifier’s harnesses. At this point, you can use a tone generator to tone the wires at the amplifier harness to each of the matching wires to each speaker.
When I identified each speaker line, I did a polarity pop on each speaker to identify the positive and negative of each channel. With all the channels identified and labeled, it was time to identify any of the remaining wires at the amplifier. I assumed the Active Noise Cancelling (ANC) was tied into the amplifier as well because the fourth plug matched the ANC bypass harness from PAC.
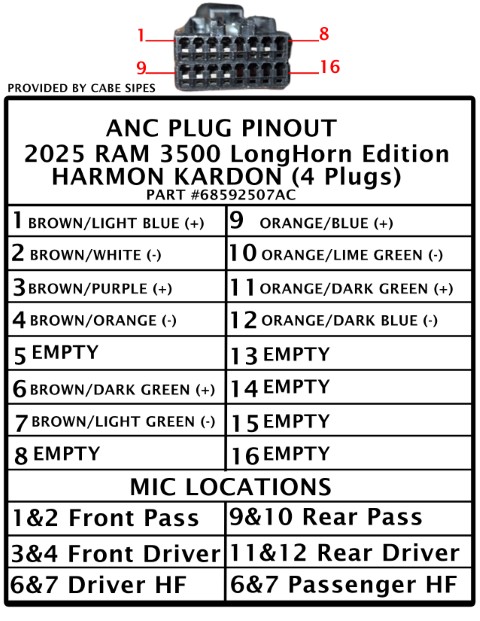
To verify this, I began removing the microphones from the Ram headliner. There were two in the rear and two in the front, plus a fifth mic for hands-free calling. With the mics removed, I compared the wire colors to the wires in the fourth plug and was able to identify them.
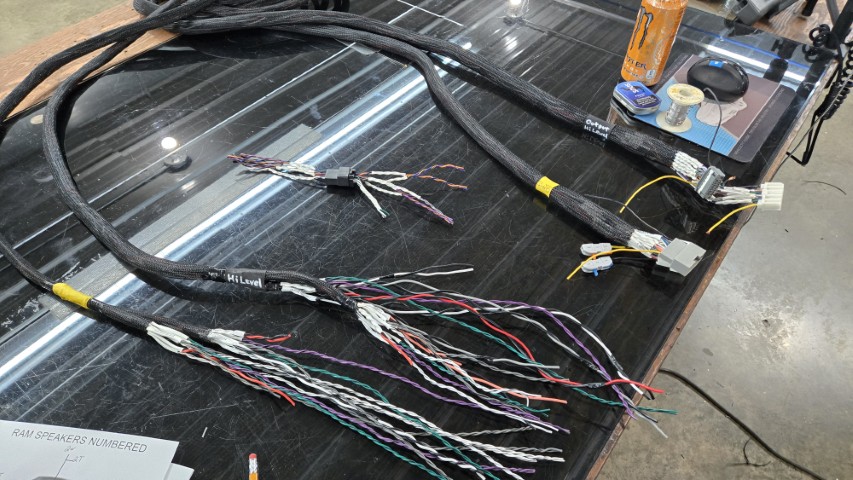
Then, I could integrate using a channel-to-channel solution in which I fed the hi-level signal of each amp channel into a DSP that would allow me to de-equalize and tune each channel independently.
The problem: The original design using the AudioControl DSP and amplifiers wouldn’t work due to the number of channels in the factory amplifier, which in this case was sixteen. The AudioControl DSP didn’t have enough input channels to handle it, so I had to redesign the build using a Helix V18 amplifier and a Helix P One Mk2 for the subwoofers, as well as a Helix P-Six DSP amplifier for separate bed speakers. Before ordering anything, I first had to verify that I could create T-harnesses for the factory amplifier. The reason for this is more personal preference than requirement. I avoid cutting or tapping into OEM wires, if possible, especially on a new vehicle that still has a factory warranty.
After checking boxes and boxes of old harnesses, as well as the AmpPro integration harnesses, I identified the plugs—PAC AmpPro CH03 and the CH01 with an ANC bypass plug. These plugs allow you to plug into the OEM plug, as well as the OEM amplifier, so a proper T-harness can be created. It would require pins to be added so all the lines are correctly populated.
While I worked on the T-harnesses, I contacted NETAUDIO.com and was told they’d be developing a T-harness for this system soon. They didn’t have one yet, so I had to create mine from scratch. I cannot stress how much work and how many hours it took to make this happen but, in the end, I had a proper T-harness that would allow me to put the system back to stock within minutes. This is very important so the vehicle’s warranty stays intact.
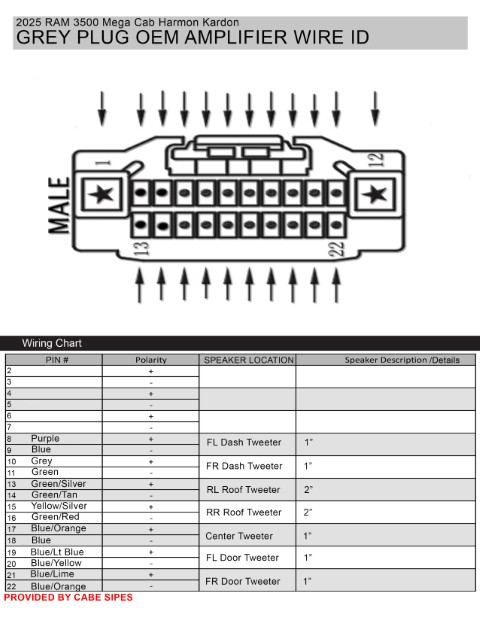
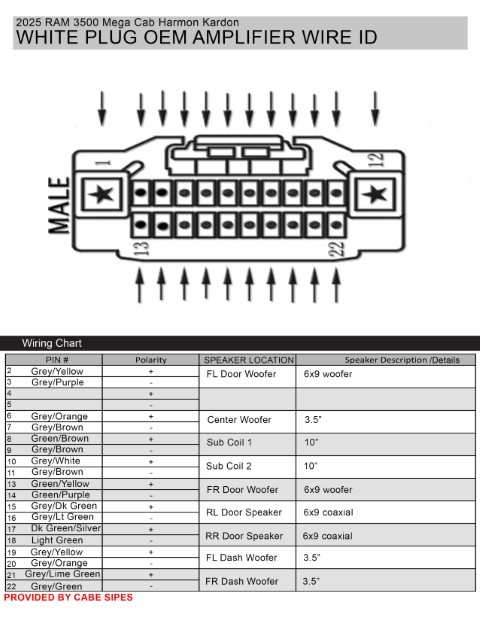
Now that I’d discovered a way to create a proper T-harness, I could move on to creating a pinout and adding wires to any unpopulated pins in the PAC harnesses and creating a schematic. There are images included in this article showing the OEM wire colors, pin locations and speaker details. Only use these as a starting point and verify all the information since it’s not uncommon for wire colors to change between the different factories on a new platform. For example, the RAM I worked on was made in Mexico, but they’re also being made in Detroit. Harnesses can have differences between the two factories.
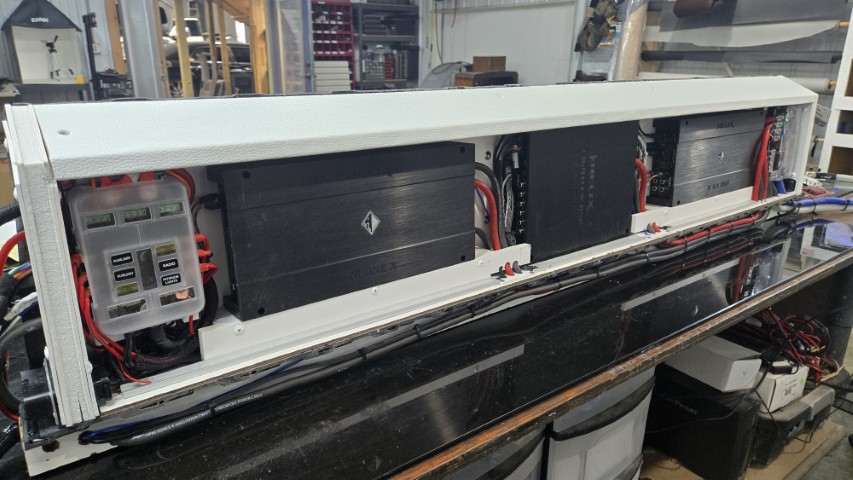
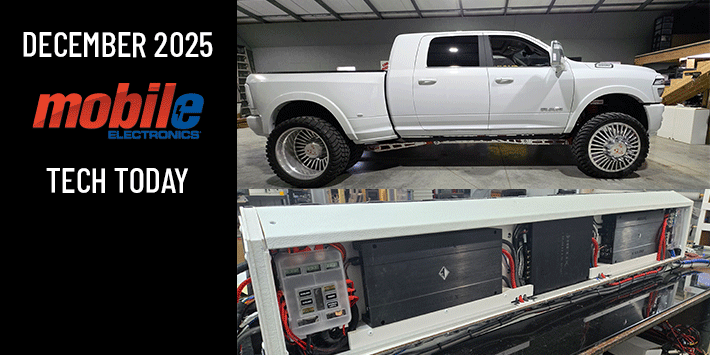
The in-process amplifier rack.
The completed amp rack.
The completed amp rack.
Why So Many Channels?
When identifying speakers, I realized why there were so few speaker locations but so many wires at the amplifier: Everything in this system is running active apart from the rear doors which are standard coaxial. This means every other coaxial is an active woofer and tweeter, so this requires two channels from the amp to each of these locations.
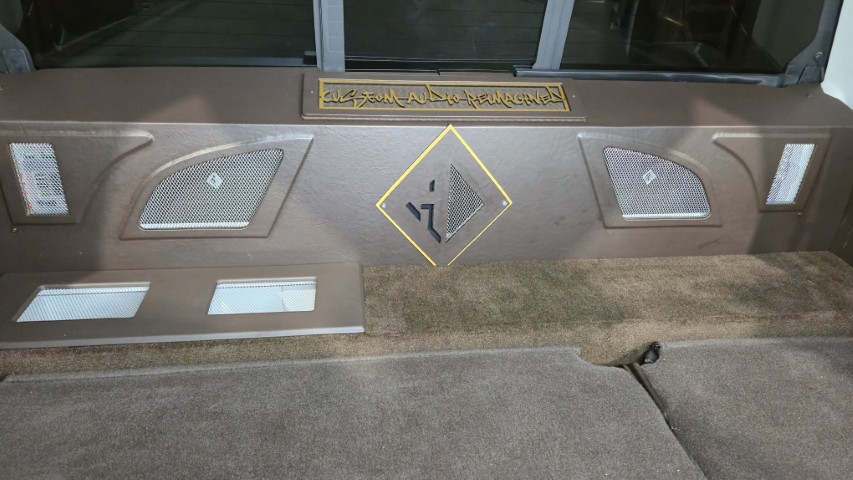
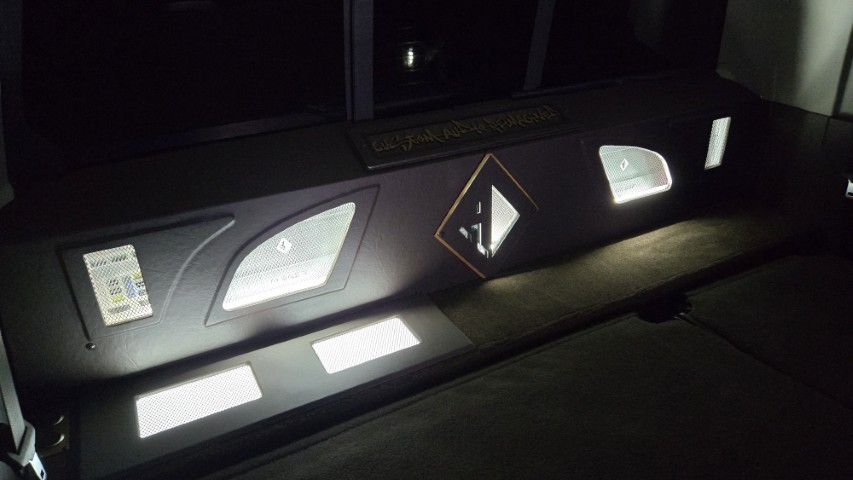
As far as the speaker sizes and locations, the dashboard has a pair of 3.5-inch active coaxial in the corners and 3.5-inch active coaxial in the center location. The front doors contain 6×9 speakers with one-inch tweeters in the upper sail and 6×9 coaxial in the rear doors. The rear ceiling has a pair of tweeters as well as a 10-inch subwoofer behind the back seat.

To ensure I wouldn’t run into any issues with the factory amplifiers’ surround sound options and other warning chimes, I did a one-to-one speaker replacement as well as retaining each speaker’s original channels when doing the channel-to-channel integration. This required me to desolder the AudioControl coaxial tweeters from the main terminals so they can run active like the factory speakers. Custom speaker plates were made to put the AudioControl 6.5-inch drivers in place of the stock 6×9 drivers. This choice was made due to the AudioControl 6×9 speakers being too deep. The front doors hold a pair of AudioControl 6.5-inch components, and the rear doors are have a pair of AudioControl 6.5-inch coaxial. The rear ceiling tweeters were left stock since they’re only used as a filler for the surround sound option.
The subwoofers used were dual AudioControl 10-inch Spike series in a NETAUDIO.com prefabricated down-fire sub enclosure in the Mega Cab section of the vehicle.
The T-harnesses for this project had to be created from scratch, which would allow for the system to return to stock within minutes if necessary. This is very important so the vehicle’s warranty stays intact.
Proper Handling of the ANC
The ANC system introduced some strange things I’d never encountered. Normally, you would need to disable the ANC system to stop any feedback loops being created by the subwoofers. When I did this, I began to hear a test sweep sound that would travel from the rear tweeters and continue forward until ending at the center channel. I am not sure if this is something that was implemented by the stock audio system to keep you from disabling the ANC, but it was strange since it travels through all the channels independently.
To remedy the issue, I re-engaged the ANC and was able to tune the system without triggering any feedback issues. This was done by not changing any of the EQ settings in the DSP and leaving them all flat. By not changing the equalizer, the only change that the ANC mics would see is the amplitude difference which I found did not trigger a feedback problem.
On top of the custom T-harnesses, I created a floating amp rack with custom made 36-pin connectors on each end. The amp rack is mounted on the back wall utilizing the factory child restraint mounting points. All the modules on the back wall were relocated to be below the floating amp rack and are hidden behind the sub enclosure that is below the rack. This allows the sub enclosure to be independently removed from the truck and allows access to all the modules on the back wall for any future service required without having to remove the amp rack.
The full setup of the build is too much to go over, and this article is intended to cover the technical side of the integration more than the actual build itself. Want to see more? Look up the Custom Audio Reimagined YouTube channel to check out the entire build.